A Comprehensive Guide on How to Use Blue Marble - The Wplace Plugin
This document serves as a detailed, step-by-step manual designed to guide you through the installation and utilization of the Blue Marble userscript. This powerful tool is specifically crafted for enhancing your creative projects on wplace.live by providing sophisticated features like template overlays, precise coordinate management, and efficient pixel placement assistance. By following this guide, you will learn exactly how to use Blue Marble to its full potential.
Understanding the Blue Marble Plugin
So, what exactly is the Blue Marble plugin? At its core, Blue Marble is a highly regarded and widely-used userscript developed for the wplace community. Its primary function is to significantly augment the user experience on the wplace.live platform. It achieves this by integrating a suite of powerful tools directly into your browser, including intuitive template overlays that allow you to project an image onto the canvas, helpful coordinate indicators for pinpoint accuracy, and various forms of drawing assistance to streamline your creative process.
This comprehensive tutorial on how to use Blue Marble is your all-in-one resource. It will not only walk you through the complete installation process for all major web browsers but also delve into the most effective usage techniques. We will cover the setup on Google Chrome, Mozilla Firefox, and Microsoft Edge, ensuring you can get started no matter your preferred platform. Furthermore, this guide will present the best practices for creating intricate and precise pixel art, helping you master the tool for superior results.
What This Guide Will Cover
Throughout this instructional journey, you will gain a thorough understanding of several key areas. We will explore the specifics of the Blue Marble installation procedure on Chrome, Firefox, and Edge, ensuring a smooth setup. You will also learn how to use Blue Marble for effective template management, a crucial skill for any large-scale project. Additionally, we will demystify the wplace coordinate system and provide advanced tips to elevate your technique. Finally, the guide will cover important settings, including the proper handling of transparent pixels in your templates to ensure your artwork appears exactly as intended on the canvas.
Blue Marble Installation for PC
This section is dedicated to providing detailed instructions for installing the Blue Marble userscript on a personal computer, covering the most popular desktop browsers.
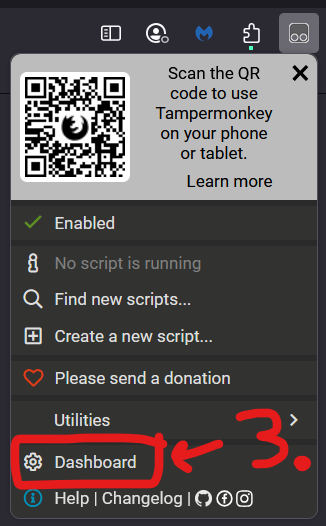
Blue Marble Installation for Mobile
For users who prefer to engage with wplace.live on the go, this section will explain the necessary steps for installing Blue Marble on mobile devices.
The Optimal Workflow for Painting on Wplace
To achieve the best results when creating your artwork on the wplace canvas, following a structured workflow is essential. Here is the recommended three-step process that leverages the power of the Blue Marble plugin. This workflow is fundamental to understanding how to use Blue Marble effectively from start to finish.
Step 1: Transform Your Image into Pixel Art
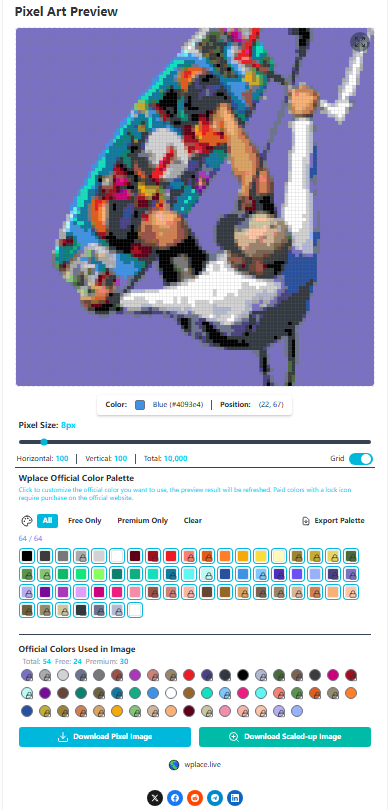
The initial and most critical phase of your project is to prepare your source image. Before you can place any pixels, you must convert your desired image into a pixel art format that is compatible with the wplace canvas. To accomplish this, utilize a specialized image to pixel art converter tool. This utility will process your image, translating it into a pixelated style, and allow you to download the resulting file, which will serve as your template.
Step 2: Pinpoint Your Coordinates on the Canvas
After you have successfully prepared your pixel art template, the next step involves navigating to the wplace.live canvas to find the perfect location for your creation. Carefully browse the canvas to identify the area where you intend to place your artwork. Once you have pinpointed the ideal spot, you must take note of the starting coordinates. These coordinates are crucial for correctly positioning your template overlay in the next step.
Step 3: Upload and Utilize Your Template
With your pixel art file ready and your target coordinates identified, it's time to bring it all together using the Blue Marble interface. Locate the Blue Marble window on your screen and click on the prominent "Upload Template" button. This action will prompt you to select the pixel art file you downloaded earlier. Once loaded, the image will appear as a semi-transparent overlay on the canvas. This powerful feature allows you to place your pixels with exceptional accuracy, ensuring your final creation perfectly matches your design. This is the core function you need to master when learning how to use Blue Marble.

In-Depth Installation Guide for Blue Marble
Google Chrome Installation
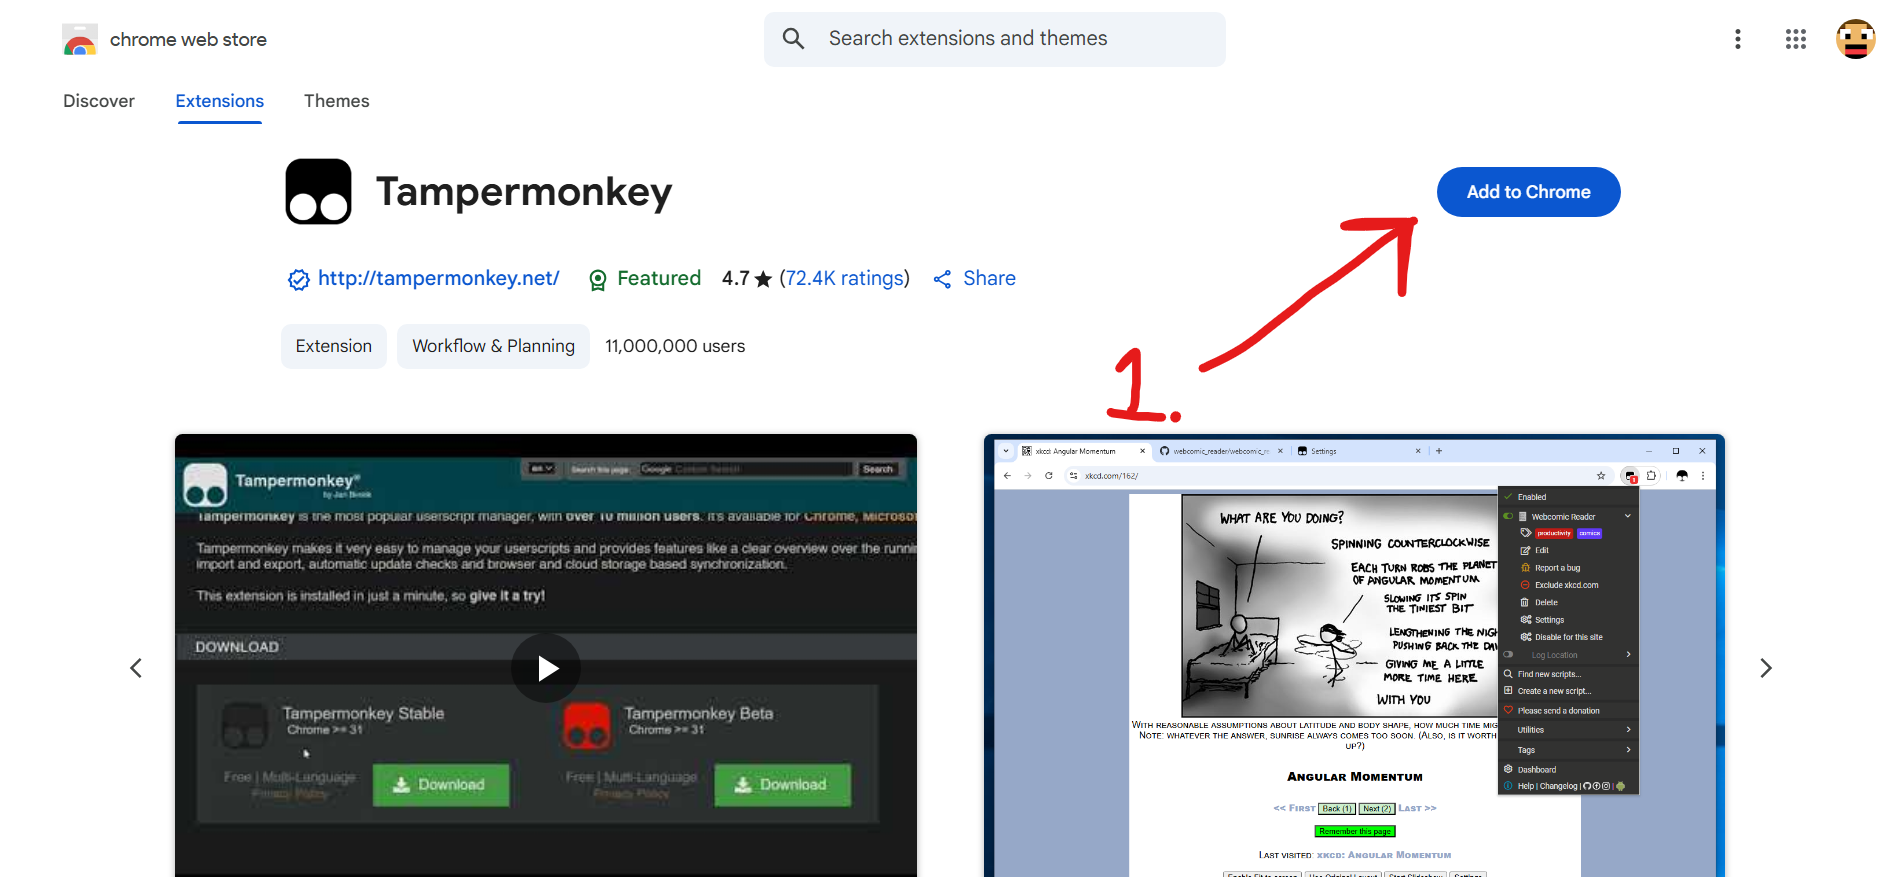
Install the Tampermonkey Extension: The first requirement for using Blue Marble on Chrome is to install the Tampermonkey extension. Navigate to the Chrome Web Store and add Tampermonkey to your browser. This extension acts as a manager for userscripts.
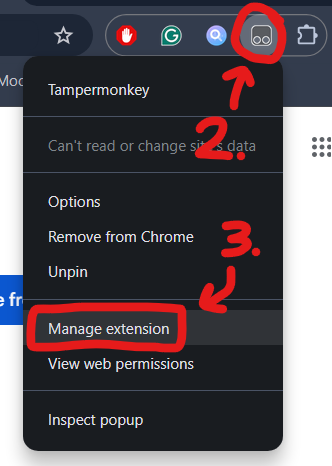
Access Extension Management: Once Tampermonkey is installed, you need to access Chrome's extension management page. You can typically find this by clicking the puzzle piece icon in your toolbar or through the "More Tools" menu.
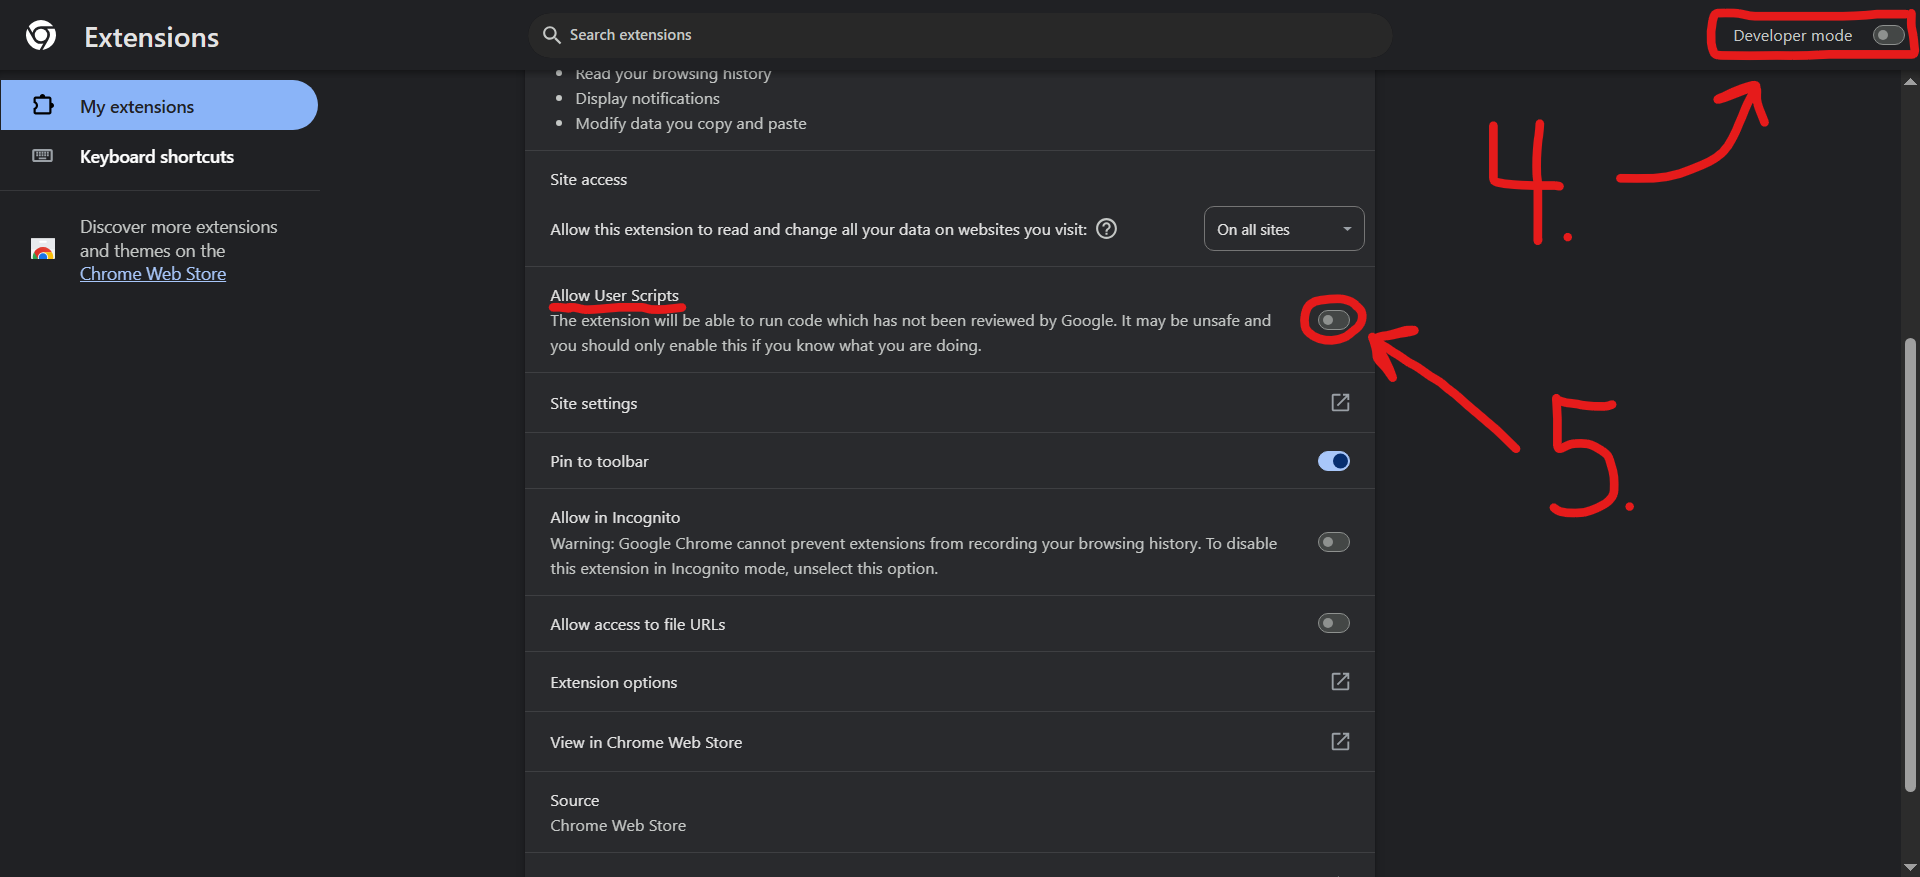
Activate Developer Mode: Within the extension management page, locate and enable the "Developer Mode" toggle. This is usually found in the top-right corner of the screen and is necessary for installing userscripts from sources other than the official store.
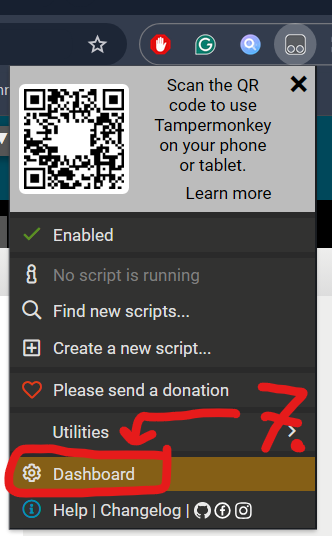
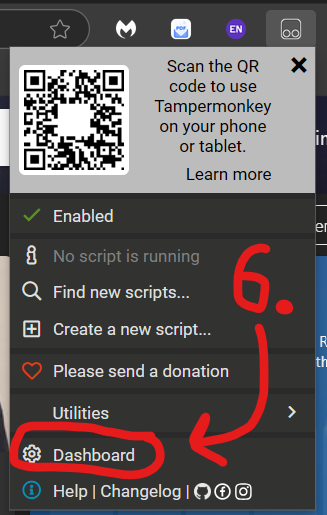
Navigate to the Tampermonkey Dashboard: With developer mode active, click on the Tampermonkey icon in your browser's toolbar and select "Dashboard" from the dropdown menu to open the script management interface.
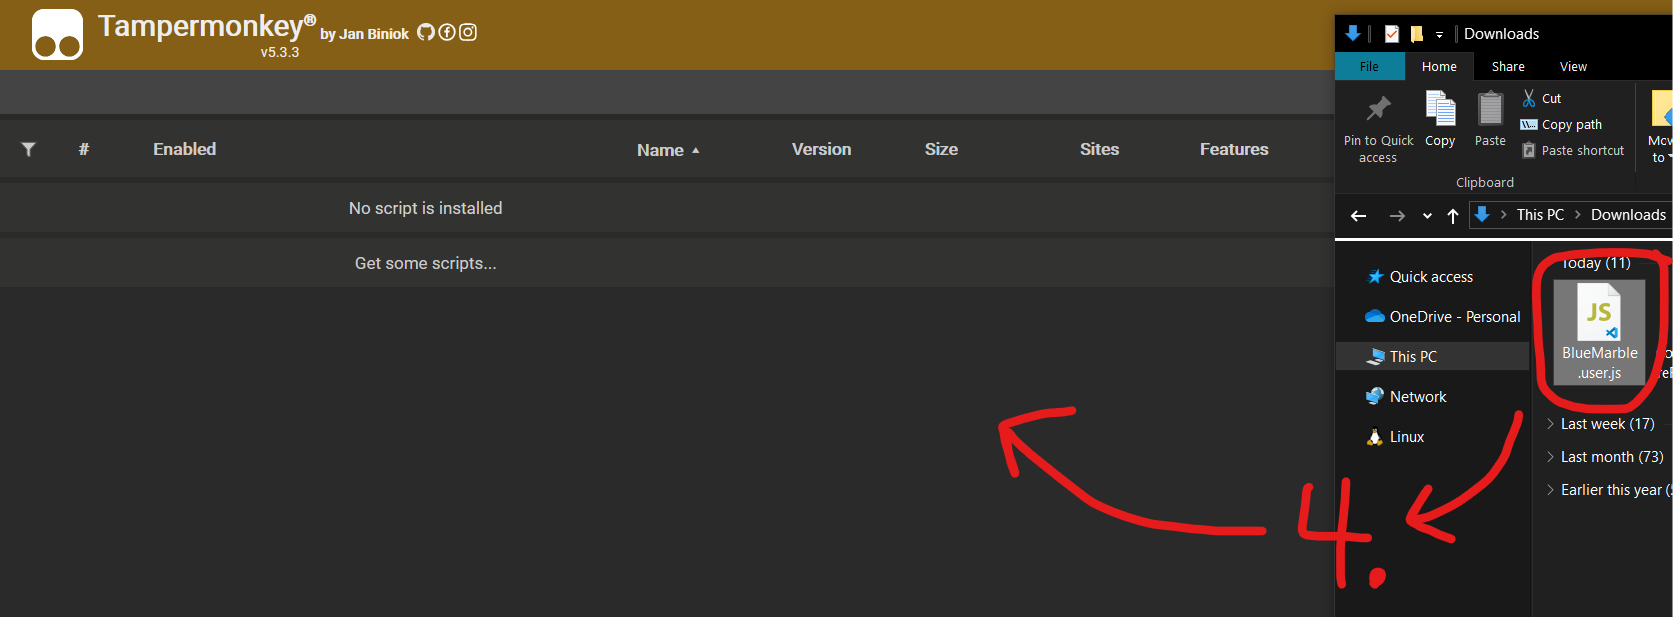
Install the Blue Marble Script: You will need to add the Blue Marble userscript file to Tampermonkey. This is often done by dragging and dropping the
.jsfile onto the Tampermonkey dashboard or by using the "Utilities" tab to install from a URL.
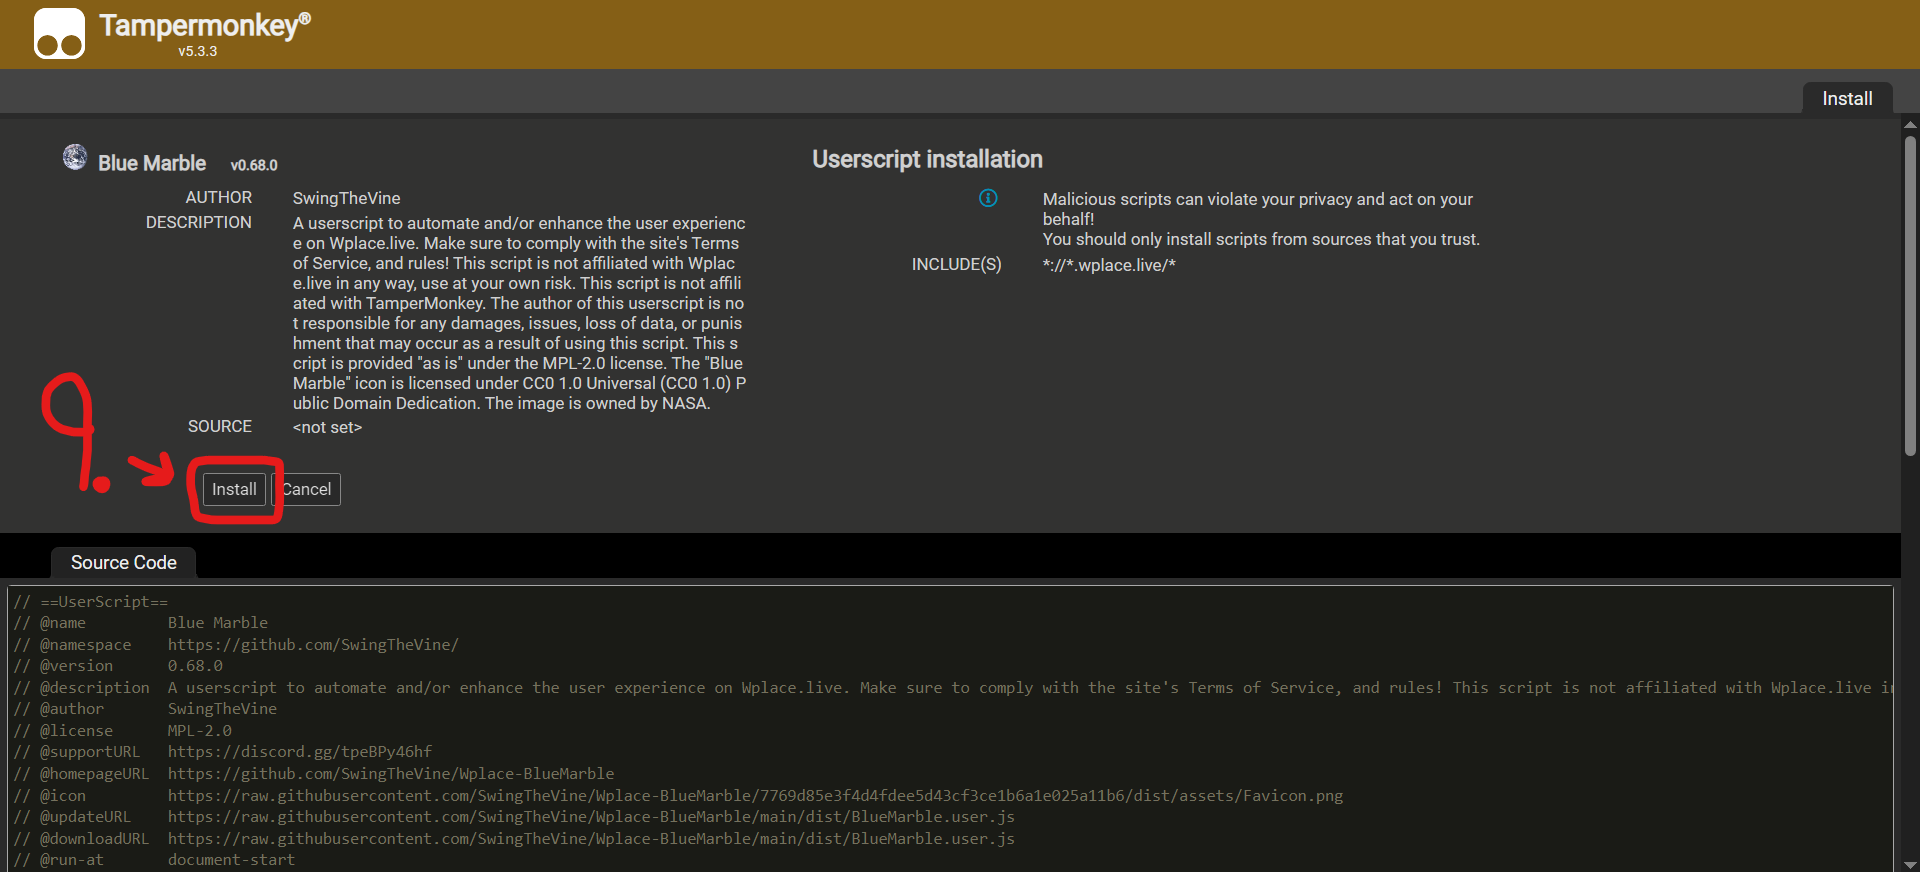
Confirm the Installation: A new screen will appear showing the details of the Blue Marble script. Review the information and click the "Install" button to proceed with the installation.
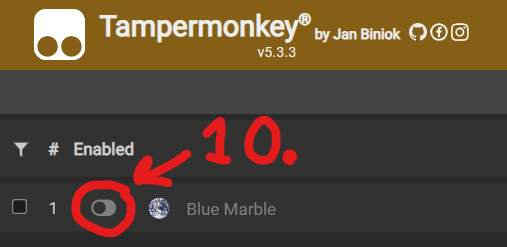
Ensure the Script is Enabled: After installation, verify that the Blue Marble script is active within the Tampermonkey dashboard. There should be a toggle switch next to the script's name; make sure it is in the "on" position.
Reload wplace.live: To complete the process, navigate to the wplace.live website and perform a full refresh of the page (Ctrl+F5 or Cmd+R). The Blue Marble interface should now be visible.
Microsoft Edge Installation
Install Tampermonkey from Edge Add-ons: Begin by opening the Microsoft Edge Add-ons store and searching for Tampermonkey. Install the extension directly from the official source.
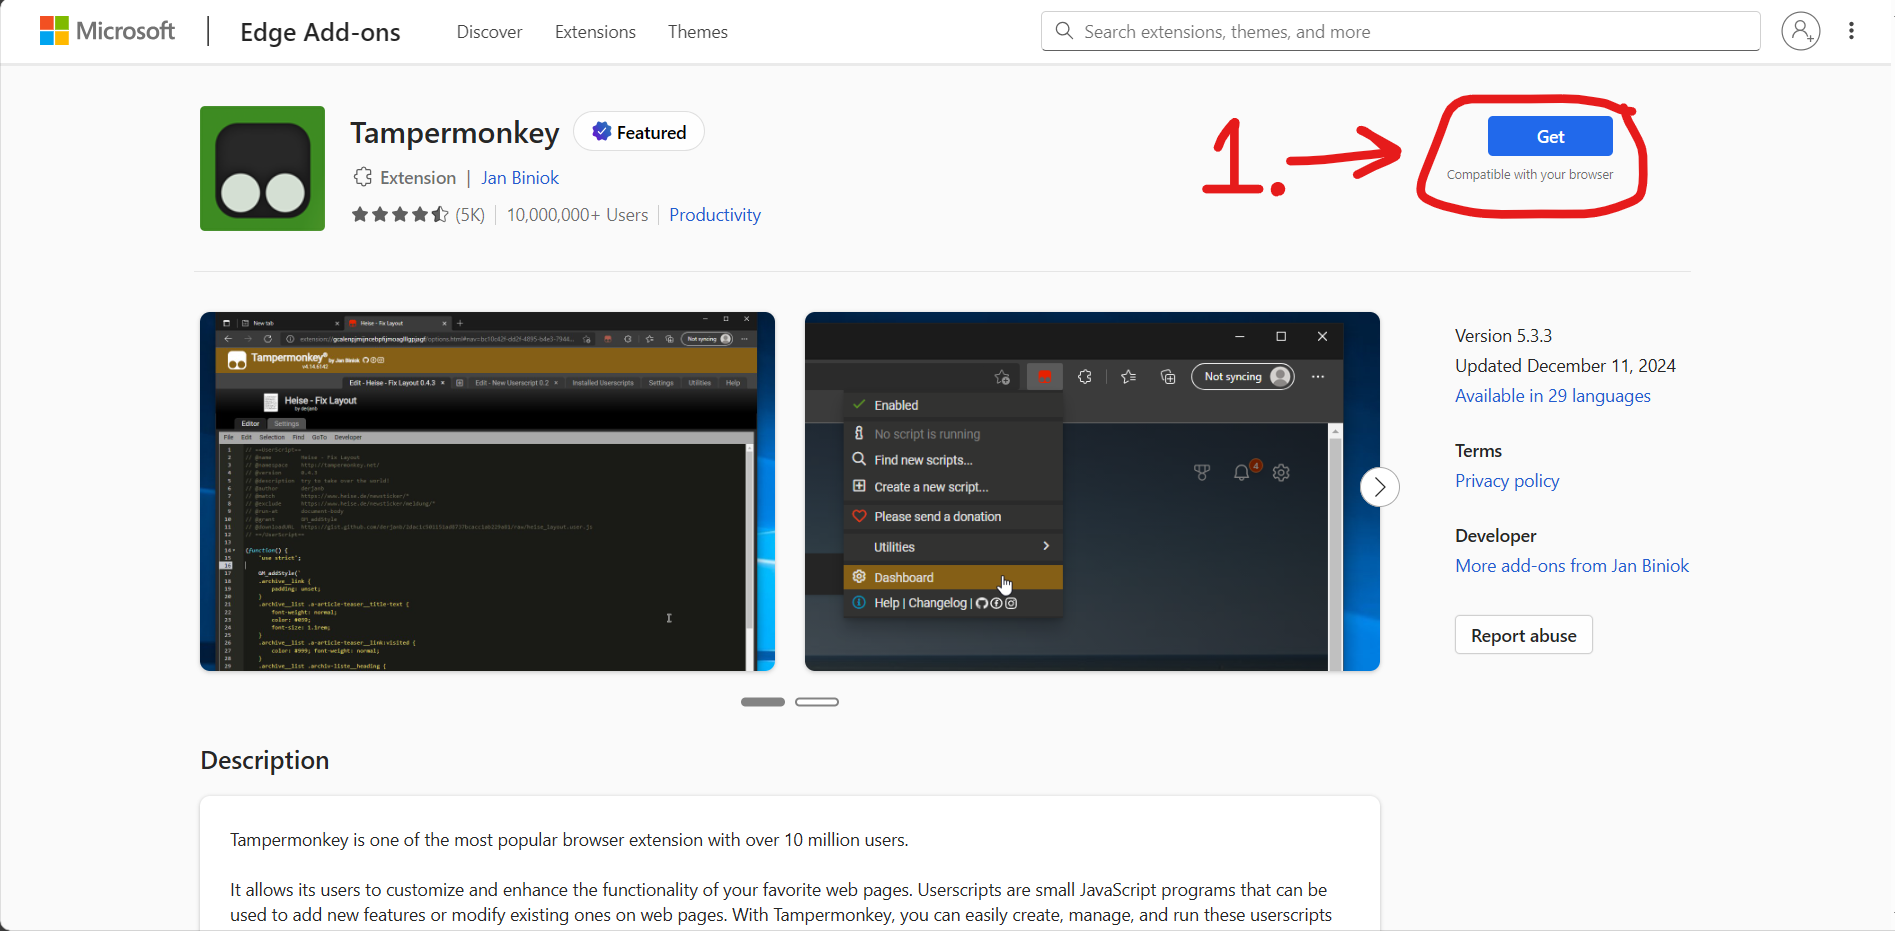
Open the Extension Management Page: Access the list of your installed extensions in Edge by navigating through the main menu (...) to the "Extensions" option.
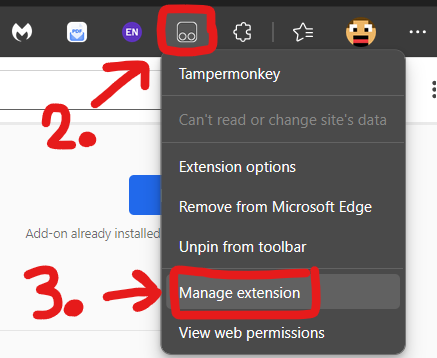
Open the Tampermonkey Dashboard: Click on the Tampermonkey icon in the Edge toolbar and select "Dashboard" from the menu that appears to manage your userscripts.
Drag and Drop to Install: Obtain the Blue Marble userscript file (
.js) and simply drag it from your computer directly onto the open Tampermonkey Dashboard window in your browser to initiate the installation.Refresh the wplace.live Page: Finally, go to the wplace.live tab in your browser and refresh the page. This action will load the script, and you will see the Blue Marble tool appear.
Mozilla Firefox Installation
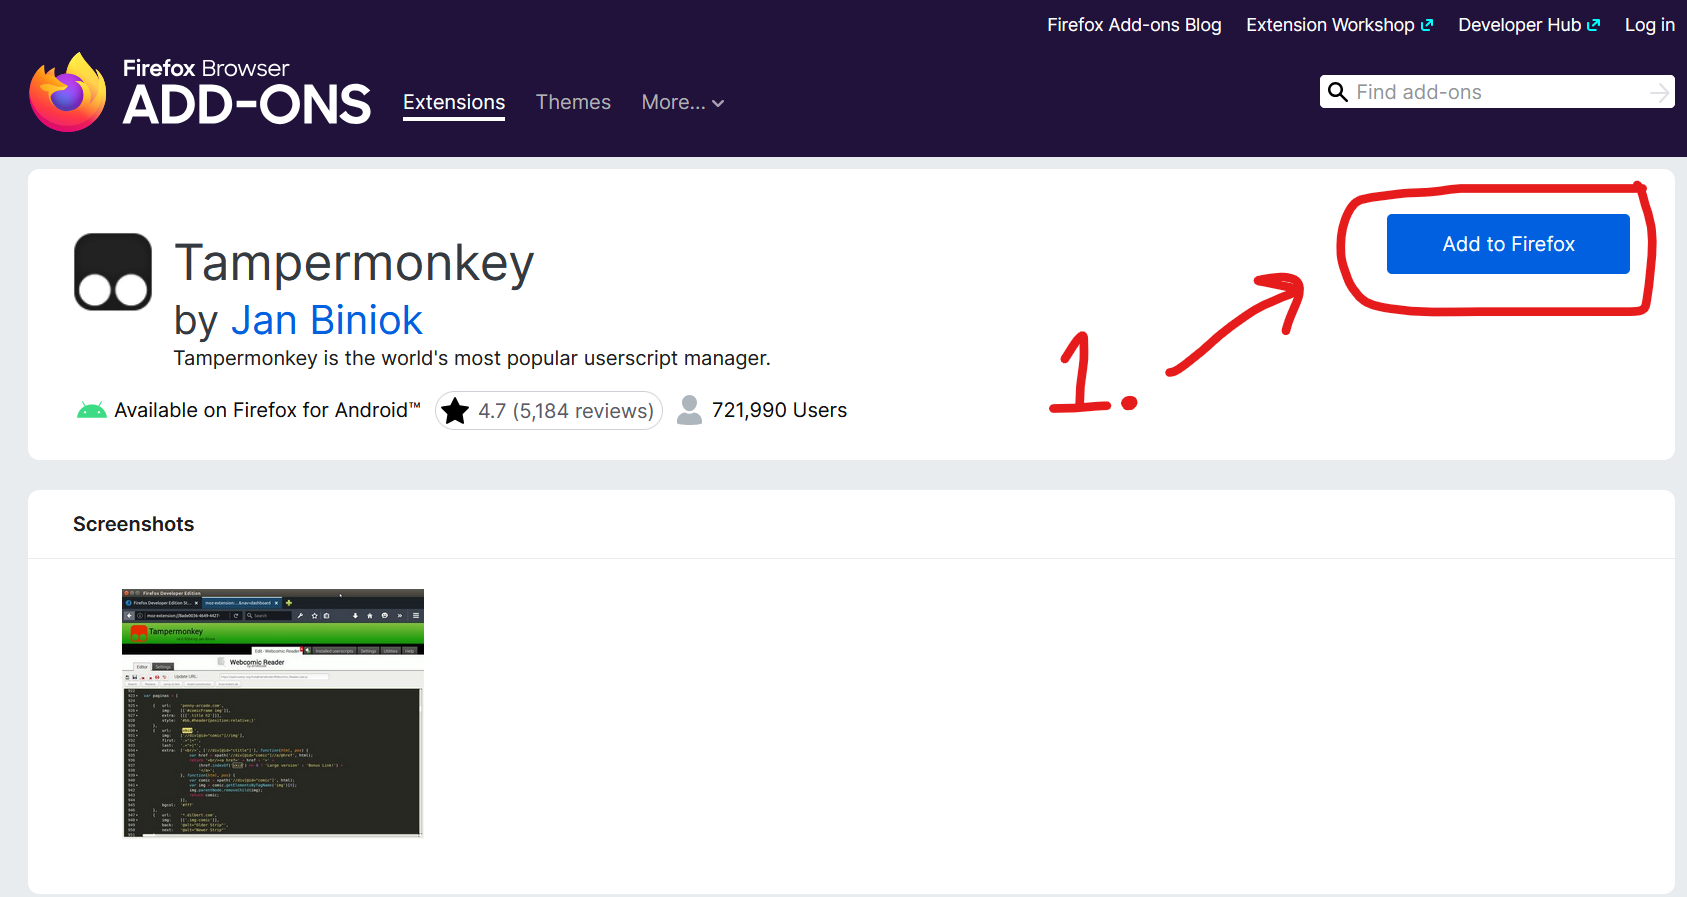
- Install Tampermonkey from AMO: Start by visiting the official Mozilla Add-ons (AMO) repository. Search for Tampermonkey and add it to your Firefox browser.
- Access the Dashboard: Once installed, click the Tampermonkey icon that appears in your Firefox toolbar. From the resulting dropdown menu, choose the "Dashboard" option to open the script management interface.
- Drag the Script to Install: With the Tampermonkey dashboard open, find the Blue Marble userscript file on your computer and drag it over to the dashboard window to begin the installation process.
- Click to Confirm Installation: A new tab will open presenting the script's details. You must click the "Install" button on this page to confirm that you want to add the script to Tampermonkey.
- Enable the Script and Refresh: Return to the Tampermonkey dashboard to ensure the script is enabled (the toggle should be on). Then, navigate to wplace.live and refresh the page to activate Blue Marble.
Guidelines for Using Templates
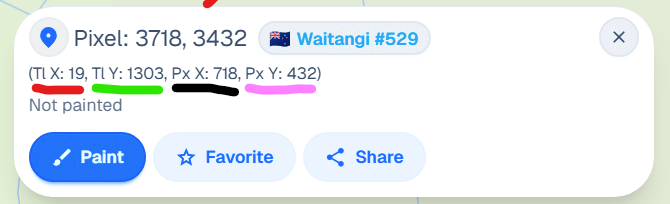
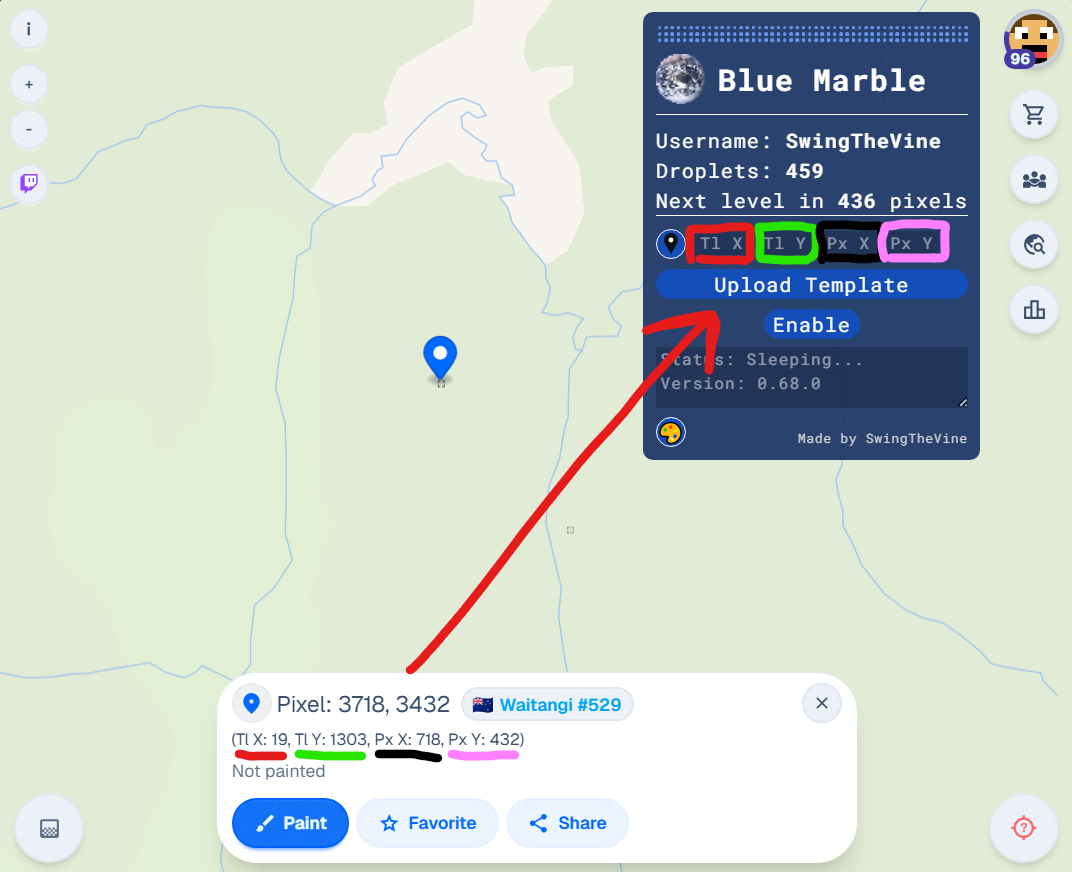
Set Your Reference Coordinates: To correctly align your template, you must first identify the pixel that corresponds to the top-left corner of your intended design area on the wplace canvas. Record its coordinates and enter them into the "Tl X/Y" (Template Left X/Y) and "Px X/Y" (Pixel X/Y) fields in the Blue Marble interface. This action syncs your template's origin with the canvas.
Upload Your Image File: Proceed by uploading your prepared pixel art template. The Blue Marble plugin supports both PNG and WEBP image formats, giving you flexibility in your file choice.
Activate the Template Overlay: After uploading the image and setting the coordinates, click the "Enable" button. This will render your template as a visible overlay on the wplace canvas, providing a direct guide for placing your pixels.
Understanding Template Settings
Transparent Pixels
It's important to understand how transparency is handled. If you want a pixel in your design to be skipped over, allowing the underlying canvas color to show through, you must set that pixel's color to the specific hex code #deface in your template image file. Pixels that are truly transparent (i.e., have an alpha channel value of zero) in your PNG or WEBP file will be completely ignored by the script and will not be rendered as part of the overlay.
Coordinates System
The positioning system on Wplace operates on a tile-relative coordinate basis. This means that coordinates are defined by a tile number and the pixel's position within that tile. To ensure your template aligns perfectly with the canvas grid, you should use the on-canvas coordinate display provided by Blue Marble. This display shows both the tile and pixel information, which is essential for precise alignment and a key part of learning how to use Blue Marble for complex projects.
How Script Versioning is Managed
The Blue Marble project adheres to the principles of Semantic Versioning, which uses a three-part version number format (X.Y.Z) to denote changes.
- X (Major): This number is incremented for major updates that introduce breaking changes. This could be due to significant modifications to the wplace.live platform itself or fundamental overhauls of the script's functionality.
- Y (Minor): This number is updated for minor releases that introduce stable, non-breaking new features or significant bug fixes that improve the user experience without altering core functionality.
- Z (Patch): This number signifies patch releases, which are typically used for development builds, minor tweaks, or immediate hotfixes that don't add new features.
Information on Licenses
The majority of the Blue Marble userscript's source code is distributed under the MPL-2.0 (Mozilla Public License 2.0). However, it is important to note that the iconic NASA 'Blue Marble' image, from which the script gets its name, is available under the CC0 1.0 Universal (CC0 1.0) Public Domain Dedication.
Frequently Asked Questions (FAQ)
Is the Blue Marble plugin safe to use?
Absolutely. The script is considered very safe for several reasons. Primarily, the complete source code is publicly available for review, promoting transparency. Anyone with coding knowledge can inspect it to verify that it contains no malicious components or harmful functionalities. Its purpose is solely to assist users on wplace.live.
Does Blue Marble automatically place pixels for me?
No, it does not. Blue Marble is designed as an assistance tool, not an automation or botting script. It helps you by providing overlays and coordinate information, but the final action of placing each pixel must be performed manually by the user. This design ensures that its usage fully respects the terms of service of the wplace.live platform.
How can I temporarily hide the template overlay?
If you need to see the canvas without the template overlay, the most straightforward method is to temporarily disable the userscript. You can do this by opening your Tampermonkey dashboard, finding the Blue Marble script in your list, and clicking the toggle to turn it off. After disabling it, you must refresh the wplace.live page for the change to take effect. You can re-enable it just as easily when you are ready to resume your work.